- The recording scriptYou will record two sets of speech data. The first is "neutral read-text" and the second will be of your own design.
There are two sources of speech material for training speech synthesis models:
- Purpose-made recordings using a script of our choice
- ‘Found’ data, such as audiobooks and podcasts
In both cases, the synthetic speech that the model eventually generates will be influenced by the speech used to train that model. The most obvious factors are the speaker, the content, and the speaking style.
For this exercise, we are going to train our model on a relatively small amount of speech, obtained from purpose-made recordings. We may need to combine this with some pre-existing purpose-made recordings from one or more other speakers.
We need to select a script for recording. The standard method for this was devised for the unit selection, and involves greedily selecting sentences, one by one, from a large text corpus (e.g., novels or newspapers) in order to maximise phonetic (and possibly prosodic) coverage. In the first part of this exercise, we will simply use the existing CMU ARCTIC script.
You should record only the ‘A’ set of 593 prompts, which will yield around 30 minutes of speech material.
Because recording will take time (around 5 hours in the studio per hour of speech material obtained), you should get started on recording the ARCTIC A sentences immediately.
Log in- Adding your own materialThe ARTIC script uses sentences from old novels, and was designed only for diphone coverage. You can do better!
The ARCTIC prompts come from old novels, and were selected under constraints described in the technical report. When you record the ARCTIC A sentences, you will discover that they are far from perfect.
Unit selection systems required complete diphone coverage. This is no longer the case for the neural model that we are using, so we have greater flexibility in our choice of training data.
For this exercise, we only have time to record a limited amount of speech in the studio, so we are only going to record a further approximately 30 minutes of material. By carefully designing this material, we may be able to create a better-sounding voice than the one using only ARCTIC material.
Using the skills that you will learn in class, you will choose a limited domain, find (or generate) some sentences from that domain, record these in the studio, then train a model on those recordings. You will probably need to also use your ARCTIC A recordings, and possibly some further data from another speaker.
Some ideas for choosing a domain:
- grammar- or vocabulary-constrained, such as weather reports, sports results, etc
- a speaking style, such as “calm” or “excited”
- a persona, such as “news anchor” or “DJ”
- Script designOnce you have chosen your domain, you need to select a set of sentences to record in the studio.
Note: this part of the exercise may require some basic coding skills (e.g., in Python). Students who cannot code will be given help in lab sessions to find an alternative.
You might select sentences from a (large) body of existing material, possibly using an algorithm of your own. Or you might generate the sentences algorithmically, either using your own method, or a Large Language Model. You could even combine these approaches (use an LLM to generate a large corpus, then select carefully from that).
Select enough sentences to yield around 30 minutes of speech.
Remember that you’ll need to record this material in the studio! Make sure to record under exactly the same conditions (same studio, same microphone, etc) in all of your recording sessions, so that you have the option of combining the data to train a single model.
Some ideas to get you started:
-
- Replicate the ARCTIC text selection algorithm, or try your own ideas (but keep it simple!)
- Use much more up-to-date source text, instead of old novels.
- Use a Large Language Model to generate text.
-
- Skills: recording speech in the studioWith our carefully chosen script, we now need to go into the recording studio and ask our voice talent to record it. Consistency is the key here, especially when the recording is done over multiple sessions.
Practice makes perfect, so you need to allow time for learning how to make good recordings. Using a recording studio, you will work with a partner with one of you acting as recording engineer whilst the other is the voice talent.
For 2025-26, students must use the University recording studios. Do NOT make your recordings at home.
Microphone technique
Good technique is important for high quality recordings, and always remember that consistency is crucial, so take a few photos of the setup so you can reproduce it in subsequent sessions.

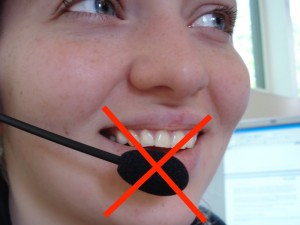
With a headset microphone, it’s important to place it to one side of the mouth to avoid breath noises
don’t place it below the mouth because you will still get breath noises from the nose
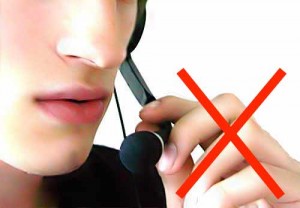
and don’t touch it whilst recording!
With a stand-mounted microphone, again you need the microphone placed to avoid breath noises from the mouth or nose, and kept at a constant distance (20-30cm). Make several test recordings to find a position that sounds good. During the recording sessions, the engineer should keep an eye on your voice talent: don’t let them move around in the chair.
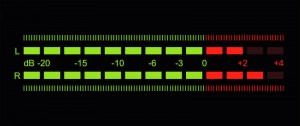
Getting the recording level correct
With digital recording, it’s essential that you never ‘hit the red’ when recording because you will get hard clipping and that will sound very bad (as well as potentially interfering with the signal processing we need to do later).
But on the other hand, you do want to record at the highest level possible (what a recording engineer would call ‘hot’) so that you make the most of the available bit depth. Recording at too low a level is equivalent to using fewer bits per sample, and can also make any imperfections in the audio signal chain (such as electrical noise within the microphone amplifier) more obvious.
Recording software
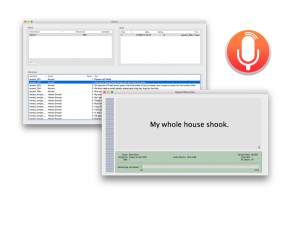
If you’re recording at home on a Mac (students taking Speech Synthesis in 2025-26 must record in a University recording studio, not at home), then you could use CSTR’s SpeechRecorder software that presents each prompt to the voice talent, and saves the recordings in individual files. Here’s the manual. To load your own sentences into this tool, they need to be in Festival’s standard ‘utts.data’ format. SpeechRecorder is already installed on the University studio computers. You do not need to install it.
For non-Mac computers, there is a Python alternative to SpeechRecorder created by previous student Tim Loderhose, and now updated and maintained by Dan Wells.
Making good, consistent recordings
You will find that you can probably record for a maximum of 2 hours at a time, with short breaks every 30 minutes or so. After that your voice will start to become creaky. Stop when this happens: you need your voice to stay consistent (it may also be damaging to your voice to speak for excessively long periods). Some recording tips:
- Switch your phone, and that of anyone else in the studio, off or place it in ‘airplane’ mode (not just silent mode) to avoid interference.
- Take a bottle of water with you and take frequent sips during recording.
- Write down (or take a photos of) the recording levels you are using and set the same levels in every session.
- Ensure chair, microphone, etc. are positioned the same way in every session (again, photos are helpful here).
- Make sure any ventilation fans are switched off during recording.
- When you are speaking, ensure that you are not fidgeting, playing with any of the cables, your hair, etc…
Of course, you should make plenty of test recordings at the outset, and listen back to them carefully over headphones to spot any problems. Once you have perfected your technique, go ahead and record the ARCTIC ‘A’ set. You should build a voice from this, to confirm that you have made sufficiently-good quality recordings, before returning to the studio to record your own material.
During the actual recording, try to get each sentence correct in a single attempt. Don’t waste time on multiple takes, except in those few cases where you made a major error. The engineer should keep notes about any sentences that need checking after the recording session.
At the end of each session, make back up a copy of your recordings on a memory stick (if using a recording studio), and/or back them up somewhere secure.
Now follow the instructions below to book the studio.
Log in- Using the University recording studiosThe University has two recording studios available for you to use.
Step 1: read this
Studios
You will use one of the two available studios and should use the same studio to make all your recordings. The microphone and other equipment may differ between them, which will make the recordings sound different. You do not want to build a voice from data with varying recording conditions.
Recording is done by pairs of students
For recording, you need to form pairs. One of you will be the Voice Talent, and the other will be the Engineer. Then you’ll swap places. If we have an odd number of students, there might be one group of 3. We formed pairs in the first class, but if you missed out then try again in the second class (tell Simon at the start of the class that you are looking for a partner).,
Choose a studio
We need to balance the usage of the two studios. To pick your studio, inspect the available training sessions here (scroll down to see both tables, one for each studio) and select the studio with the fewest people currently signed up for training.
Step 2: book a training session
Training is done in groups of 4 (two pairs). Please try to make up full groups, so prefer slots where there are already two people signed up in the sheet.
Appleton Tower (basement room B.Z.31)
- Check the available training sessions here (make sure to look at the “Appleton Tower” part of this workbook)
- Send an email to the PPLS Studio Technician ppls.studio@ed.ac.uk with subject “Speech Synthesis training session booking request (Appleton Tower)” and include both of your names. List all the sessions that your pair is available for, in order of preference. The Studio Technician will enter your pair into the sheet above, and confirm by email.
Informatics Forum sound studios (basement room B.Z16)
- Check the available training sessions here (make sure to look at the “Informatics Forum” part of this workbook)
- Send an email to the Tutor Jinzuomu Zhong <jzhong@ed.ac.uk> with subject “Speech Synthesis training session booking request (Informatics Forum)”. List all the sessions that your pair is available for, in order of preference. The Tutor will enter your pair into the sheet above, and confirm by email.
- Your studio is located in the Informatics Forum, where you must sign in at reception in order to enter this building. Then proceed down the stairs which are in the middle of the atrium. Remember to sign out when you leave.
Step 3: book recording sessions
Do not book any recording sessions until you have completed the training session!
Once you are trained, you may book a recording session in your studio. In order to maximise availability of the studios for everyone, each booked session should be a maximum of 2 hours in duration. Quickly cancel any booking that you no longer require.
Appleton Tower
- Check availability and make a booking yourself on the PPLS Appleton Tower booking system – this requires EASE authentication
- For Project title, write “Speech Synthesis recording”
- For Full description, list the people who will take part in the session
- Type: internal
- For Email Address, write the email address of the person making the booking, in s1234567@ed.ac.uk format
- Consent has been obtained: tick
- For Full Name, write the name of the person making the booking
- Each recording pair may hold a maximum of two hours (i.e., 1 x 2-hour, or 2 x 1-hour) of future bookings at any time.
Informatics Forum
- Check availability on Korin’s Informatics Sound Studio booking spreadsheet (click on the “wc” tabs at the bottom for each week starting with the given Monday date). Available slots are the empty ones. You may only use this studio between 09:00 and 17:00 on weekdays and you are only allowed to be in the building during those hours. Remember to sign in and out at reception.
- Email a booking request from your University email account to Korin.Richmond@ed.ac.uk with subject “Speech Synthesis recording session booking request (Informatics Forum)” in which you
- list all the people who will take part in the session (student number + full name)
- list possible dates/times/durations of the slot(s) you want, in order of preference
- (don’t request times that are already booked for training, which you can see in the link above, under “Step2”)
- Korin will book the first available slot(s) from your list, and confirm by email
- Each recording pair may hold a maximum of two hours (i.e., 1 x 2-hour, or 2 x 1-hour) of future bookings at any time.
- Prepare the recordingsMove your recordings into the workspace, convert the waveforms to the right format, and do some sanity checking.
Studio recordings use a high sampling rate, perhaps as high as 96 kHz, which is unnecessarily high for the purposes of this exercise. Your recordings might also be at a high bit depth of 24 bits.
Before starting any processing, keep a backup of the original recordings somewhere safe, in case you make a mistake.
Place a copy of the recordings from the studio somewhere you can listen to them conveniently (e.g., your own laptop or a PPLS lab computer) and where you have the necessary tools available (e.g., sox)
Choose amongst the multiple takes
In the studio, you probably made multiple attempts at a few of the more difficult sentences. It’s likely that the last take is the one you want (your engineer will have kept notes to help you), so you can simply delete all earlier takes of each sentence. If absolutely necessary you will need to listen to multiple takes, then select the best one. Delete all unwanted takes.
The SpeechRecorder tool adds a suffix to the file basenames to indicate the ‘take’. You need to remove this so that the basenames exactly match the utterance identifiers in utts.data. Write a shell script to remove these suffixes (noting that the suffix might vary: “_1”, “_2”, etc. depending on which take you selected for each prompt).
Check
At this stage, you should have one wav file per line in your utts.data file. Listen to all the files (Mac tip: use the Finder, navigate with the cursor keys, and use the spacebar to play each file). If you find any mismatches with the text (e.g., a substituted word), then an expedient solution is to edit the text (and not to re-record the speech – do not be a perfectionist!). Ensure that the file naming exactly matches utts.data.
In general, do not re-record any utterances. A few missing utterances is not a major problem. Don’t be a perfectionist!
Downsample
Write a little shell script that downsamples all your recordings to 22.05 kHz and (if necessary) reduces bit depth to 16 bits. Here is how to do that with sox, for a single file:
bash$ sox recordings/arctic_a0001.wav -b16 -r 22050 wav/arctic_a0001.wav
Listen to a few files after downsampling, to check everything worked correctly.
Create a dataset
All you need to do now is create a dataset from your recordings. This simply comprises all the wav files and the utts.data file – copy these to ECDF so you can train a model on them.
Log inRelated posts
Related forums
-
- Forum
- Topics
- Last Post
-
-
Signal processing
Questions about feature extraction, time and pitch modification, or anything else we can do to speech waveforms.
- 46
- 1 year, 6 months ago
-
Signal processing
-
Record your own speech data
The recorded speech data comprises text-speech pairs from which we will train a model. The model will therefore be influenced by both the content (e.g., words, phonetic coverage) and speaking style.
Log in